How to Upload 360 Image to Facebook
- Knowledge needed: Basic HTML5 (opens in new tab), intermediate jQuery, JavaScript (opens in new tab) and CSS (opens in new tab)
- Requires: jQuery, CanvasLoader, pre-rendered epitome sequence
- Project Time: 1 hr
- Back up file
This article first appeared in event 224 of .net magazine – the world's best-selling magazine for web designers and developers.
Nosotros're going to build a 360 view prototype slider. What tin can you employ it for? Well, information technology comes in very handy when your customer wants to show their product from every angle rather than showing just a couple of unproblematic angle shots.
We've seen quite a few squeamish interactive examples from car and telephone manufacturers showcasing their products using this technique, but in about cases they use Flash.
I love interactivity, but I don't actually like using plug-ins unless it's essential, then in this tutorial we'll build our own 360 view awarding using HTML, CSS and JavaScript.
How will it piece of work?
We're going to exist using a pre-rendered image sequence, displaying a 3D object rotated around its y-axis. The sequence contains 180 images to show an blitheness as smoothly as possible. The user tin can 'rotate the object' by dragging the mouse horizontally, or by swiping their fingers over the image slider on a touchscreen.
How will we do it?
Showtime we'll build our HTML markup, then we'll add some custom CSS including media queries, and then we'll go far smashing with JavaScript. To make it more than exciting non just volition we make information technology work on desktop computers but also on iPhones and iPads because the app works very well with impact events.
Before we start, let me say a massive thank you to Mateusz Sypien and Maya Prodanova for their astonishing 360 artwork!
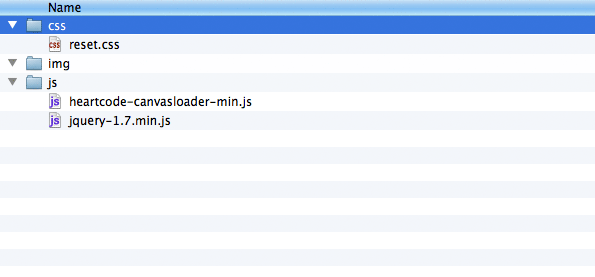
01. Folders
In the project binder we have a css folder, a js folder and an img folder. The css folder contains the reset.css file, the img folder contains the paradigm sequence and the js folder contains the jQuery and Heartcode CanvasLoader libraries.
02. New projection
Create a new HTML file and relieve it to the project root as alphabetize.html. In the <caput> nosotros set the viewport for mobile devices by making our content non- scaleable. We include two CSS files: Eric Meyer'southward reset.css and the threesixty.css, which volition contain our custom styles.
<!DOCTYPE html>
<html lang="en">
<caput>
<meta charset="utf-8">
<meta name="viewport" content="initial-scale=ane.0, maximum-calibration=1.0" />
<championship>360</title>
<link rel="stylesheet" href="css/reset.css" media="screen" type="text/css" />
<link rel="stylesheet" href="css/threesixty.css" media="screen" blazon="text/css" />
</head>
<trunk>
<div id="threesixty">
<div id="spinner">
<span>0%</span>
</div>
<ol id="threesixty_images"></ol>
</div>
</body>
</html>
03. Loading percentage
Create a wrapper <div> for the slider. It contains an <ol>, which will concur the image sequence as <li>s, and also holds the preloader <div> holding a <span> for the loading pct display. We volition add together the images dynamically using JavaScript.
<!DOCTYPE html>
<html lang="en">
<head>
<meta charset="utf-8">
<meta proper name="viewport" content="initial-scale=ane.0, maximum-scale=ane.0" />
<title>360</title>
<link rel="stylesheet" href="css/reset.css" media="screen" blazon="text/css" />
<link rel="stylesheet" href="css/threesixty.css" media="screen" type="text/css" />
</head>
<trunk>
<div id="threesixty">
<div id="spinner">
<span>0%</span>
</div>
<ol id="threesixty_images"></ol>
</div>
</body>
</html>
04. Adding interaction
Just before the </body>, include the JS files we'll exist using. jQuery helps us to add together interaction rapidly, the Heartcode CanvasLoader volition add together a smooth preloader animation. The threesixty.js file will contain the JavaScript that controls the image slider.
<!DOCTYPE html> <script src="js/heartcode-canvasloader-min.js"></script>
<html lang="en">
<head>
<meta charset="utf-8">
<meta proper noun="viewport" content="initial-scale=1.0, maximum-scale=1.0" />
<title>360</title>
<link rel="stylesheet" href="css/reset.css" media="screen" type="text/css" />
<link rel="stylesheet" href="css/threesixty.css" media="screen" type="text/css" />
</head>
<trunk>
<div id="threesixty">
<div id="spinner">
<span>0%</span>
</div>
<ol id="threesixty_images"></ol>
</div>
<script src="js/jquery-1.7.min.js"></script>
<script src="js/threesixty.js"></script>
</torso>
</html>
05. Styling
Now create the threesixty.css file. The reset.css file sets all the default behaviours, so we tin move on to the fun $.25. Style the #threesixty wrapper first. The default prototype slider will be 960px by 540px, centred horizontally and vertically. Nosotros besides set the <ol> chemical element to be hidden.
#threesixty {
position:absolute;
overflow:hidden;
superlative:50%;
left:50%;
width:960px;
height:540px;
margin-left:-480px;
margin-top:-270px;
}
#threesixty_images {
display: none;
}
06. Fix the display
To brand the interface work on dissimilar screens while keeping proportions consistent, we're going to control the display using media queries. Y'all can see in the snippet above how nosotros define our different resolution and orientation device criteria using the max-device-width and orientation properties combined with the and operator. The snippet above sets the display for iPad (1024px broad) and iPhone/iPod touchscreens, both in landscape and portrait modes (480px wide). The images will take upwardly all of the available infinite inside the wrapper.
@media screen and (max-device-width: 1024px) and (orientation:portrait) {
#threesixty {
width:720px;
height:450px;
margin-left:-360px;
margin-height:-225px;
}
}
@media screen and (max-device-width: 480px) and (orientation:mural),
screen and (-webkit-min-device-pixel-ratio: 2) and (orientation:mural) {
#threesixty {
width:360px;
acme:225px;
margin-left:-180px;
margin-top:-113px;
}
}
@media screen and (max-device-width: 480px) and (orientation:portrait),
screen and (-webkit-min-device-pixel-ratio: 2) and (orientation:portrait) {
#threesixty {
width:320px;
height:200px;
margin-left:-160px;
margin-summit:-100px;
}
}
07. Images
All the images volition exist placed in the <ol>. Kickoff we set up the style for every prototype in the wrapper. We don't desire the images to all be visible, so nosotros define the electric current-image and the previous-image classes that control their visibility. We'll swap between these states with JavaScript.
#threesixty img {
position:absolute;
top:0;
width:100%;
height:car;
}
.current-image {
visibility:visible;
width:100%;
}
.previous-prototype {
visibility:subconscious;
width:0;
}
08. Preloader way
Style our preloader past making #spinner subconscious, setting its dimensions and placing it in the centre of the wrapper. We also set the styles of the span inside the #spinner to be horizontally and vertically centred so the text volition be in the middle of the round animation.
#spinner { position:absolute; left:l%; top:50%; width:90px; height:90px; margin-left:-45px; margin-top:-50px; brandish:none;}#spinner span { position:absolute; top:l%; width:100%; color:#333; font:0.8em Arial, Verdana, sans; text-align:center; line-height:0.6em; margin-top:-0.3em;}
09. Getting ready
Create a new JS file and save information technology as threesixty.js in the js folder. Identify the code into the jQuery DOM-Ready function, so that past the time the script starts running, the DOM elements are already in place. ready will enable the user interaction when our app is ready.
Dragging tells u.s.a. if the user is using the arrow. With speedMultiplier nosotros set the speed of the image sliding; we've got some variables to store the pointer positions – the timers will track the pointer changes – and we define some variables to continue track of the frame calculations and image loading.
$(certificate).ready(function () { monitorStartTime = 0, totalFrames = 180,
var set = faux,
dragging = false,
pointerStartPosX = 0,
pointerEndPosX = 0,
pointerDistance = 0,
monitorInt = 10,
ticker = 0,
speedMultiplier = 10,
spinner,
currentFrame = 0,
frames = [],
endFrame = 0,
loadedImages = 0;
});
10. Spinner
We create the addSpinner function that adds a CanvasLoader instance with custom settings inside the #spinner. The spinner volition be a 90x90px, spiral shaped loader with a shine circular animation. Telephone call its show method, then display it by using the jQuery fadeIn.
function addSpinner () { spinner = new CanvasLoader("spinner"); spinner.setShape("screw"); spinner.setDiameter(90); spinner.setDensity(90); spinner.setRange(i); spinner.setSpeed(4); spinner.setColor("#333333"); spinner.show(); $("#spinner").fadeIn("slow");};
11. Image loading and frames array
The load image office creates a <li> with an <img> inside. Hide the epitome with the previous-epitome class. The loadedImages variable generates the paradigm proper noun, which increments each fourth dimension a new image is loaded; if successful, nosotros call the imageLoaded function.
In ane single line of code we create a new <img>, point its source to the generated file name, and so hide information technology by applying the previous-paradigm class. All in one line thanks to jQuery! We shop each image object returned past jQuery in the frames assortment, which will exist handy when information technology comes to animation.
function loadImage() {
var li = certificate.createElement("li");
var imageName = "img/threesixty_" + (loadedImages + 1) + ".jpg";
var image = $('<img>').attr('src', imageName).addClass("previous-prototype").appendTo(li);
frames.button(paradigm);
$("#threesixty_images").append(li);
$(paradigm).load(role() {
imageLoaded();
});
};
12. Image overload
There are also many images to load all at once, and so we phone call loadImage recursively. The paradigm loading procedure is shown by writing the per centum text into the #spinner <span>. Once all the images are loaded, we make the first image visible and hide the preloader.
office imageLoaded() {
loadedImages++;
$("#spinner span").text(Math.floor(loadedImages / totalFrames * 100) + "%");
if (loadedImages == totalFrames) {
frames[0].removeClass("previous-image").addClass("current-image");
$("#spinner").fadeOut("dull", part(){
spinner.hibernate();
showThreesixty();
});
} else {
loadImage();
}
};
xiii. Smoothen transition
Display the image slider with a shine transition using the showThreesixty function. We launch the app by calling addSpinner() and loadImage(). When tested, the preloader fades in, and when the images loaded, a transition hides it and displays the kickoff image.
function imageLoaded() { function showThreesixty () { addSpinner();
loadedImages++;
$("#spinner span").text(Math.floor(loadedImages / totalFrames * 100) + "%");
if (loadedImages == totalFrames) {
frames[0].removeClass("previous-image").addClass("current-image");
$("#spinner").fadeOut("slow", role(){
spinner.hibernate();
showThreesixty();
});
} else {
loadImage();
}
};
$("#threesixty_images").fadeIn("slow");
ready = true;
};
loadImage();
14. Frame values
The slider blitheness is going to exist simple: nosotros tween the current frame value to a set terminate frame value and display the current epitome. A custom easing method calculates the distance betwixt the frames and creates a smooth spinning animation in either direction.
Create the return function that updates the frame animations. If the electric current frame hasn't reached the end frame, movement it closer past irresolute its value: when information technology reaches the end frame, stop the rendering. Update the images with the hidePreviousFrame and showCurrentFrame functions.
function render () {
if(currentFrame !== endFrame)
{
var frameEasing = endFrame < currentFrame ? Math.flooring((endFrame - currentFrame) * 0.1) : Math.ceil((endFrame - currentFrame) * 0.1);
hidePreviousFrame();
currentFrame += frameEasing;
showCurrentFrame();
} else {
window.clearInterval(ticker);
ticker = 0;
}
};
15. Ticker
The refresh function calls our return function, which creates a setInterval that we store in the ticker variable. To make sure we don't make any unwanted calls, check to see if the ticker is already running. I prepare the FPS value to threescore, so nosotros can have a nice, smooth animation.
function refresh () {
if (ticker === 0) {
ticker = self.setInterval(render, Math.round(m / 60));
}
};
sixteen. Normalised value
hidePreviousFrame and showCurrentFrame bandy usa of the current paradigm. Call getNormalizedCurrentFrame() to go the frame value between i-180, which returns the 'normalised' value of currentFrame that we use to dispense the current image.
To get a 'swooshy' effect the electric current frame value tin can't become out of the range defined past totalFrames. With the getNormalizedCurrentFrame function commands, we can summate the values inside the totalFrames range so the blitheness moves accurately.
function hidePreviousFrame() { function showCurrentFrame() { role getNormalizedCurrentFrame() {
frames[getNormalizedCurrentFrame()].removeClass("current-epitome").addClass("previous-epitome");
};
frames[getNormalizedCurrentFrame()].removeClass("previous-epitome").addClass("current-image");
};
var c = -Math.ceil(currentFrame % totalFrames);
if (c < 0) c += (totalFrames - i);
return c;
};
17. Testing
Allow's give information technology a quick test. In the showThreesixty part nosotros will add two things: first we gear up the endFrame to -720, and 2d, nosotros call the refresh method. If yous exam the application, yous will run into the images quickly swooshing effectually as they're fading in.
function showThreesixty () {
$("#threesixty_images").fadeIn("ho-hum");
ready = true;
endFrame = -720;
refresh();
};
eighteen. User interaction
Add the user interaction. Starting time with the mouse consequence listeners, then add together the custom function getPointerEvent, which tells united states if the user uses a mouse or finger. On mouse down, we store the pointer X position, and on mouse move we call trackPointer().
function getPointerEvent(event) { $("#threesixty").mousedown(function (consequence) { $(certificate).mouseup(role (event){ $(document).mousemove(office (consequence){
return event.originalEvent.targetTouches ? outcome.originalEvent.targetTouches[0] : issue;
};
event.preventDefault();
pointerStartPosX = getPointerEvent(outcome).pageX;
dragging = truthful;
});
upshot.preventDefault();
dragging = imitation;
});
event.preventDefault();
trackPointer(event);
});
xix. Bear on events
Now add together the touch events. We utilise the getPointerEvent() to pass the right effect to the trackPointer function. For all events, we prevent the defaultbehaviour and set the dragging value to truthful if the user is dragging the pointer, and to false for when they release.
$("#threesixty").live("touchstart", function (event) { $("#threesixty").alive("touchmove", function (effect) { $("#threesixty").live("touchend", function (upshot) {
event.preventDefault();
pointerStartPosX = getPointerEvent(effect).pageX;
dragging = true;
});
event.preventDefault();
trackPointer(event);
});
upshot.preventDefault();
dragging = faux;
});
20. Tracking movement
In trackPointer() we track the pointer movement periodically to brand the frameanimation flow with the pointer dragging. Equally you lot can see, nosotros only track the pointer if dragging is true and the application is set up. Nosotros do this because the rendering can be quite CPU intense and nosotros take to be smart with the processing.
Store the start and end x pointer positions, then check the distance between them within the fourth dimension periods. Using pointerDistance, calculate the blitheness endFrame and update it by calling the refresh office. speedMultiplier gives us full control over the spinning speed.
function trackPointer(event) {
if (ready && dragging) {
pointerEndPosX = getPointerEvent(event).pageX;
if(monitorStartTime < new Date().getTime() - monitorInt) {
pointerDistance = pointerEndPosX - pointerStartPosX;
endFrame = currentFrame + Math.ceil((totalFrames - ane) * speedMultiplier * (pointerDistance / $("#threesixty").width()));
refresh();
monitorStartTime = new Date().getTime();
pointerStartPosX = getPointerEvent(event).pageX;
}
}
};
21. We're done!
If you test the application you lot can see the percent loader animation fading in and out, then the images showing up with the 'swooshy' spin. Now yous can use the image slider with your mouse, or a bear on on mobile devices, to make the 360 image slider spin with a responsive, smooth blitheness.

The all-time way to test the application on mobile devices is to place the projection files onto a server, or share your localhost with the device. You can as well run across how different device screen resolutions and orientations are handled with media queries.
I have decided to make this slider open source, and created a git repository to permit others to collaborate and help to make information technology awesome.
Róbert Pataki is a artistic technologist with years of experience in Wink technologies and creative ad and currently works for digital agency Waste product Artistic in London.
Liked this? Read these!
- How to build an app (opens in new tab): effort these great tutorials
- Gratis graphic design software available to you right now!
- Our favourite spider web fonts - and they don't price a penny
- Discover what's side by side for Augmented Reality
Source: https://www.creativebloq.com/css3/build-360-view-image-slider-javascript-3122883
0 Response to "How to Upload 360 Image to Facebook"
Postar um comentário